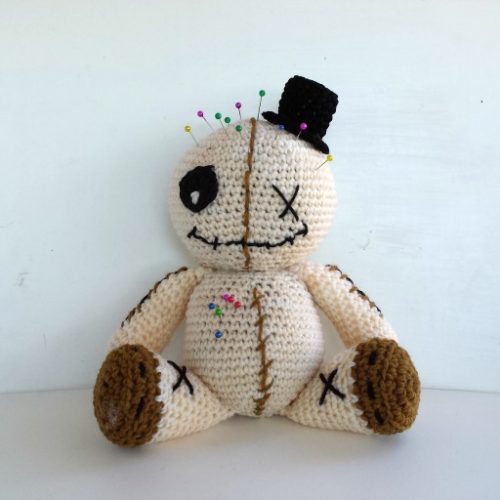
Schema per realizzare la tua voodoo doll bambola amigurumi.
Livello: Medio
Materiale occorrente
Filato beige/corda e nero
imbottitura per amigurumi
uncinetto da 3 mm
ago da lana
Abbreviazioni
MB: maglia bassa
M: maglia
DIM: diminuzione
Nota Lo schema è eseguito a maglia bassa in cerchio continuo.
TESTA
Giro 1. Fare un cerchio magico e 6 MB (6)
Giro 2. 2 MB in ogni M del giro precedente (12)
Giro 3. 2 MB nella 1°M + 1MB nella succ M – per tutto il giro (18)
Giro 4. 2 MB nella 1°M + 2MB nella succ M – per tutto il giro (24)
Giro 5. 2 MB nella 1°M + 3MB nella succ M – per tutto il giro(30)
Giro 6. 2 MB nella 1°M + 4MB nella succ M – per tutto il giro (36)
Giro 7. 2 MB nella 1°M + 5MB nella succ M – per tutto il giro (42)
Giro 8. 2 MB nella 1°M + 6MB nella succ M – per tutto il giro (48)
Giro 9. 2 MB nella 1°M + 7MB nella succ M – per tutto il giro (54)
Giro 10-19. 1MB in ogni M del giro precedente (54)
Giro 20. 1 DIM + 7 MB (48)
Giro 21. 1 DIM + 6 MB (42)
Giro 22. 1 DIM + 4 MB (35)
Giro 23. 1 DIM + 2 MB (26)
Giro 24. 1 DIM + 1 MB (17)
Chiudere il lavoro e tagliare il filo lasciandone abbastanza per la cucitura della testa al corpo. per rendere la testa più compatta potete usare un trucco al momento dell’imbottitura, basterà usare una calza di nylon vecchia, riempirla di cotone sintetico e inserirla all’interno, come vi mostro nella immagine seguente. Il risultato sarà più sferico e a prova di qualsiasi spillone! Ho usato una calza nera nonostante il filato chiaro per dare un effetto ombreggiato e scurire il candore del total white.

IMG 1 Come imbottire un amigurumi rotondo
CORPO
Giro 1. Fare un cerchio magico e 6 MB (6)
Giro 2. 2 MB in ogni M del giro precedente (12)
Giro 3. 2 MB nella 1°M + 1MB nella succ M – per tutto il giro (18)
Giro 4. 2 MB nella 1°M + 2MB nella succ M – per tutto il giro (24)
Giro 5. 2 MB nella 1°M + 3MB nella succ M – per tutto il giro(30)
Giro 6. 2 MB nella 1°M + 4MB nella succ M – per tutto il giro (36)
Giro 7. 2 MB nella 1°M + 5MB nella succ M – per tutto il giro (42)
Giro 8. 2 MB nella 1°M + 6MB nella succ M – per tutto il giro (48)
Giro 9-17. 1MB in ogni M del giro precedente (48)
Giro 18. 1 DIM + 4 MB (40)
Giro 19. 1 DIM + 3 MB (32)
Giro 20. 1 DIM + 2 MB (24)
Giro 21. 1 DIM + 1 MB (16)
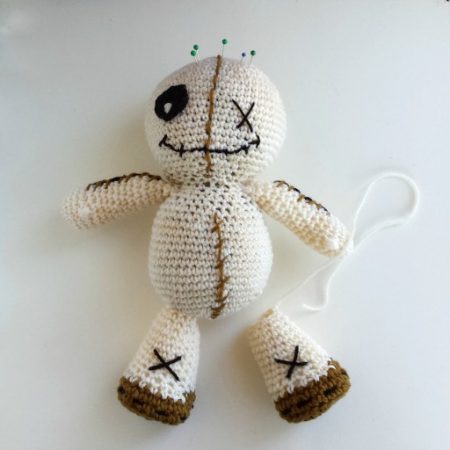
Chiudere il lavoro e tagliare il filo. Decorare con cuciture e cicatrici per dare effetto bambola da paura e imbottire con la solita procedura usata per la testa.
BRACCIA (N. 2)
Giro 1. Fare un cerchio magico e 6 MB (6)
Giro 2. 2 MB in ogni M del giro precedente (12)
Giro 3. 2 MB nella 1°M + 1MB nella succ M – per tutto il giro (18)
Giro 4-8. 1MB in ogni M del giro precedente (18)
Giro 9. 1 DIM + 1 MB (12)
Giro 10-20. 1MB in ogni M del giro precedente (12) e chiudere
GAMBA (N. 2)
Si parte dal “piede” con un colore scuro
Giro 1. Fare un cerchio magico e 6 MB (6)
Giro 2. 2 MB in ogni M del giro precedente (12)
Giro 3. 2 MB nella 1°M + 1MB nella succ M – per tutto il giro (18)
Giro 4. 2 MB nella 1°M + 2MB nella succ M – per tutto il giro (24)
Giro 5. 1MB in ogni M dietro del giro precedente (24)
Giro 6. 1MB in ogni M del giro precedente (24)
In colore bianco
Giro 7. *1 DIM + 1 MB* ripetere da*a* 3 volte + 15 MB (21)
Giro 8. *1 DIM + 1 MB* ripetere da*a* 3 volte + 12 MB (18)
Giro 9-15. 1MB in ogni M del giro precedente (18) e chiudere
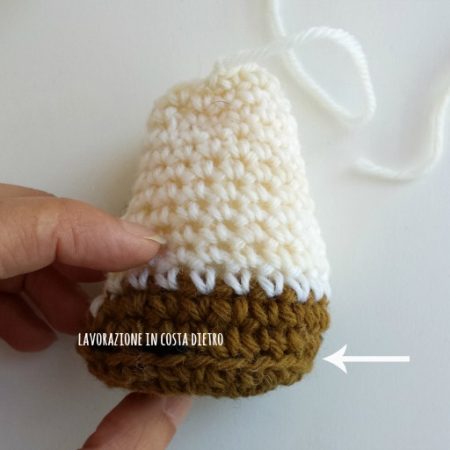
IMG 2 come si lavora nella costa dietro – how to work in back loop
E’ arrivato il momento di attaccare tutte le parti al corpo!
 Perchè non aggiungere un CAPPELLO A CILINDRO per dare personalità al pupazzo? Realizzarlo è semplicissimo:
Prima parte : BASE
Giro 1. Fare un cerchio magico e 6 MB (6)
Giro 2. 2 MB in ogni M del giro precedente (12)
Giro 3. 2 MB nella 1°M + 1MB nella succ M – per tutto il giro(18) Giro 4. 2 MB nella 1°M + 1MB nella succ M – per tutto il giro (24)
Seconda parte: CILINDRO
Giro 1. Fare un cerchio magico e 4 MB (4)
Giro 2. 2 MB in ogni M del giro precedente (8)
Giro 3. 2 MB nella 1°M + 1MB nella succ M – per tutto il giro (12)
Giro 4. 1MB in ogni M dietro del giro precedente (12)
Giro 5. 1MB in ogni M del giro precedente (12)
 Non resta altro che cucire la base insieme alla parte alta del cappello, fermandovi poco prima della chiusura totale per inserire un po’ di imbottitura.

Cilindro pronto per essere cucito, rigorosamente a 3/4
Se avete dubbi, osservazioni o vi va di condividere le vostre voodoo doll scrivetemi o contattatemi su Facebook o Twitter. Questo schema è gratuito ed è permesso l’uso privato. Non vendere o copiare.
![]() ***English translation***
***English translation***
This pattern is made in continuous rounds.
Abbreviations
INC : 2 single crochet in the same stitch
SC Decrease : Single Crochet Decrease (this decreases the size)
ST: stitch
SC: single crochet
HEAD
1 rd . 6 sc into a magic ring (6) See my video tutorial on Youtube
2 rd . 2 sc in each sc around (12)
3 rd . *2 sc in next st, sc in next st*, rep from *to* (18)
4 rd . *2 sc in next st, 2 sc in next st*, rep from *to* (24)
5 rd . *2 sc in next st, 3 sc in next st*, rep from *to* (30)
6 rd . *2 sc in next st, 4 sc in next st*, rep from *to* (36)
7 rd . *2 sc in next st, 5 sc in next st*, rep from *to* (42)
8 rd . *2 sc in next st, 6 sc in next st*, rep from *to* (48)
9 rd . *2 sc in next st, 7 sc in next st*, rep from *to* (54)
10-19 rd. 1 Sc in each st around
20 rd . *SC decrease + 7 sc* rep from *to* (48 sts)
21 rd . *SC decrease + 6 sc* rep from *to* (42 sts)
22 rd . *SC decrease + 4 sc* rep from *to* (35 sts)
23 rd . *SC decrease + 2 sc* rep from *to* (26 sts)
24 rd . *SC decrease + 1 sc* rep from *to* (17 sts)
Fasten off. At this moment you have to stuff the head and a useful tip to stuff firmly your amigurumi parts is to use a nylon stockings to give a perfect round shape to your head as shown in the IMG n. 1.
Body
1 rd . 6 sc into a magic ring (6)
2 rd . 2 sc in each sc around (12)
3 rd . *2 sc in next st, sc in next st*, rep from *to* (18)
4 rd . *2 sc in next st, 2 sc in next st*, rep from *to* (24)
5 rd . *2 sc in next st, 3 sc in next st*, rep from *to* (30)
6 rd . *2 sc in next st, 4 sc in next st*, rep from *to* (36)
7 rd . *2 sc in next st, 5 sc in next st*, rep from *to* (42)
8 rd . *2 sc in next st, 6 sc in next st*, rep from *to* (48)
9 rd-17 rd. 1 Sc in each st around (48)
18rd . *SC decrease + 4 sc* rep from *to* (40 sts)
19 rd . *SC decrease + 3 sc* rep from *to* (32 sts)
20 rd . *SC decrease + 2 sc* rep from *to* (24 sts)
21 rd . *SC decrease + 1 sc* rep from *to* (16 sts)
Fasten off, now you can add some decorative stitches/dots, sew little zipper or scars and stuff following the same procedure used for the head.
Arms (make 2)
1 rd . 6 sc into a magic ring (6)
2 rd . 2 sc in each sc around (12)
3 rd . *2 sc in next st, sc in next st*, rep from *to* (18)
4-8 rd . 1 sc in each sc around (18)
9 rd . SC decrease + 1 sc* rep from *to* (12 sts)
10-20 rd . 1 sc in each sc around (12)
Legs (make2)
Starting from the foot use a dark brown color
1 rd . 6 sc into a magic ring (6)
2 rd . 2 sc in each sc around (12)
3 rd . *2 sc in next st, sc in next st*, rep from *to* (18)
4 rd . *2 sc in next st, 2 sc in next st*, rep from *to* (24)
5 rd . in back loop only (IMG 2) 1 sc in each sc around (24)
6 rd . 1 sc in each sc around (24)
Change in white color
7 rd . *SC decrease, 1 sc* rep from *to* 3 times and 15 sc (21 sts)
8 rd . *SC decrease* rep from *to* 3 times and 12 sc (18 sts)
9-15rd. 1 sc in each sc around (18)
TOP HAT
First part : BASE
1 rd . 6 sc into a magic ring (6)
2 rd . 2 sc in each sc around (12)
3 rd . *2 sc in next st, sc in next st*, rep from *to* (18)
4 rd . *2 sc in next st, 2 sc in next st*, rep from *to* (24)
Seconda parte: TOP
1 rd . 4 sc into a magic ring (4)
2 rd . 2 sc in each sc around (8)
3 rd . *2 sc in next st, sc in next st*, rep from *to* (12)
4 rd . in back loop only 1 sc in each sc around (12)
5 rd . 1 sc in each sc around (12)
Stuff a little and sew together the 2 parts. Your hat is finish and now attach all the parts to the body of your doll, and your voodoo doll is ready to be pinned!
I have created this as a free pattern for personal use and I would ask that this pattern not to be copied or sold.
Copyright 2015 Fabcroc

Io Ale e voodino

Bellissimo Fabiana.
Segnalato su Creatività Organizzata.
Un abbraccio.
Ste
L’ho fatto in due giorni, bellissimo progettino, mi piace tanto