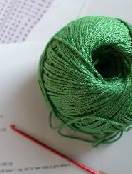
C’è aria di estate, spremute e frutta, la mia passione! Per questo schema mi sono fatta ispirare da una caipirinha su un’amaca, dal sapore rinfrescante del lime, dal verde e giallo che adoro. Cosa aspettiamo quindi, inforchiamo l’uncinetto e cominciamo questa Lime bag seguendo il mio schema gratuito per uncinetto.
Livello: facile – Materiale occorrente
Cotone bianco (colore A)
Cotone giallo (colore B)
Cotone verde (colore C)
Uncinetto da 3 mm
Ago da ricamo
Tessuto per fodera
Nota Lo schema è eseguito a maglia bassa MB in cerchio con aumenti (2 MB nella stessa maglia del giro prec).
Schema per realizzare LIME BAG finita di diametro 22 cm circa
Colore A
Giro 1 creare un cerchio magico e 6 MB all’interno.(6) Il mio video tutorial può aiutarti
Giro 2 6 aumenti (12)
Colore B
Giro 3 – 1 aumento e 1 MB per tutto il giro (18)
Giro 4 – 1 aumento e 2 MB per tutto il giro (24)
Giro 5 – 1 aumento e 3 MB per tutto il giro (30)
Giro 6 – 1 aumento e 4 MB per tutto il giro (36)
Giro 7 – 1 aumento e 5 MB per tutto il giro (42)
Giro 8 – 1 aumento e 6 MB per tutto il giro (48)
Giro 9 – 1 aumento e 7 MB per tutto il giro (54)
Giro 10 – 1 aumento e 8 MB per tutto il giro (60)
Giro 11 – 1 aumento e 9 MB per tutto il giro (66)
Giro 12 – 1 aumento e 10 MB per tutto il giro (72)
Giro 13 – 1 aumento e 11 MB per tutto il giro (78)
Giro 14 – 1 aumento e 12 MB per tutto il giro (84)
Colore A
Giro 15 – 1 aumento e 13 MB per tutto il giro (90)
Colore C
Giro 16 – 1 aumento e 14 MB per tutto il giro (96)
Giro 17 – 1 aumento e 15 MB per tutto il giro (102)
Giro 18 – 1 aumento e 16 MB per tutto il giro (108)
*Fare 2 cerchi seguendo questo schema.*
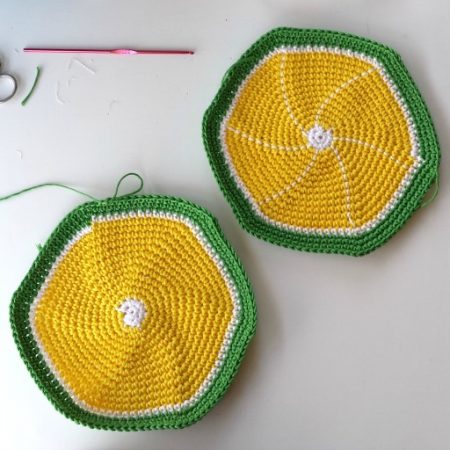
Le due fette sono pronte
Chiudere il primo e decorare con ago e filo bianco per dare l’effetto spicchio.
Il secondo dovrà avere la asola per il bottone.
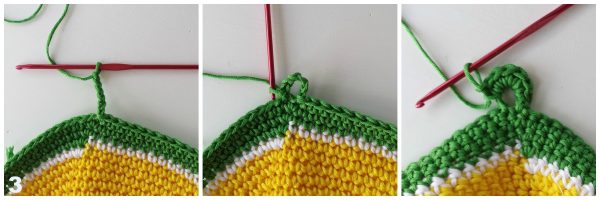
Per chiudere con un bottone sul davanti seguite questi passaggi
Finire il giro 18 con una maglia bassissima; fare 8 catenelle chiuderle con una maglia bassissima nella maglia successiva e fare 6 MB all’interno delle catenelle; chiudere con una maglia bassissima. Lasciare il lavoro aperto per accoppiare successivamente i 2 cerchi.
FODERA INTERNA
E’ molto importante in quanto la borsa non avrebbe abbastanza sostegno. Scegliete quindi delle stoffe abbastanza pesanti.
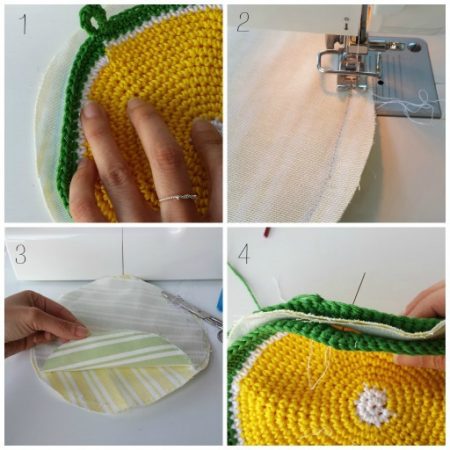
Tutti i passaggi per realizzare la fodera. Cucite i due cerchi dal rovescio poi rigirateli e le malefatte saranno meno evidenti
Consigli: Ritagliate 2 dischi un po’ più grandi dei vostri lime, cuciteli dal rovescio lasciando una parte aperta di circa 17 cm (immagine 3) dove andrà il bottone e rifinite questa parte con un orlo a mano. Se ci sono imperfezioni pensate che andrà all’interno della borsa e l’umore migliorerà. Se volete mettere una cerniera questo è il momento, io ho optato per il caro, semplice, decorativo bottone.
PER FINIRE _ assemblare_
– Cucite con filo bianco poco spesso le fette di lime accoppiate su una faccia e sull’altra della fodera (immagine 4), lasciando il diritto all’interno cioè a vista quando aprirete la borsetta.
– Riprendete l’uncinetto e continuate il giro del lavoro non finito accoppiando però le due fette esterne. Continuate con una MB per tutto il giro senza chiudere però la parte aperta.
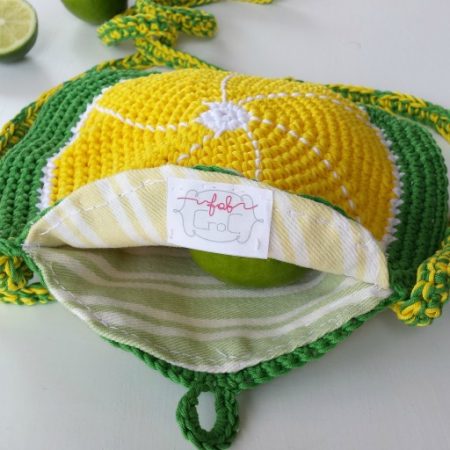
Buona estate! Enjoy your summer
TRACOLLA
Colore B+C Avviare catenelle fino a raggiungere circa 1 mt; saltare la 1° cat dall’uncinetto e fate MB strette fino alla fine.
Se volete invece acquistare la borsa finita il mio shop A little market vi aspetta!
 ***English translation***
LIME BAG free pattern crochet
Skill level easy:
1 skein white cotton yarn (color A)
1 skein yellow cotton yarn (color B)
1 skein green cotton yarn (color C)
size 3 mm hook
yarn needle
button
lining fabric
The pattern is worked in single crochet SC as a series of increases and looks long but is very quick and easy, so don’t be fazed by it!
Finished dimensions: 22 cm diameter
Color A
1 rd – 6 SC into a magic ring (6) See my video tutorial on Youtube
2 rd – [2 sc in each sc around ] (12)
Color B
3 rd – [inc 2, sc in next sc] repeat all around (18)
4 rd – [inc 2, 2 SC ] repeat all around (24)
5 rd – [inc 2, 3 SC ] repeat all around (30)
6 rd – [inc 2, 4 SC ] repeat all around (36)
7 rd – [inc 2, 5 SC ] repeat all around (42)
8 rd – [inc 2, 6 SC ] repeat all around (48)
9 rd – [inc 2, 7 SC ] repeat all around (54)
10 rd – [inc 2, 8 SC ] repeat all around (60)
11 rd – [inc 2, 9 SC ] repeat all around (66)
12 rd – [inc 2, 10 SC ] repeat all around (72)
13 rd – [inc 2, 11 SC ] repeat all around (78)
14 rd – [inc 2, 12 SC ] repeat all around (84)
Color A
15 rd – [inc 2, 13 SC ] repeat all around (90)
Color C
16 rd – [inc 2, 14 SC ] repeat all around (96)
17 rd – [inc 2, 15 SC ] repeat all around (102)
18 rd – [inc 2, 16 SC ] repeat all around (108)
Make 8 chains as button holder, slip stich to close it and 6 SC in the loop you’ve created (picture 3).Cut yarn and weave in ends.
Make another one, stop at round 18 and do not fasten off, you will crochet all around with a SC joining the 2 slices lately.
Lining
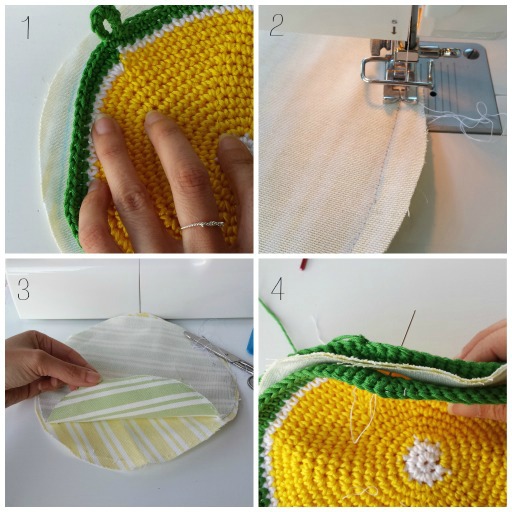
Place the lining fabric on top of the slice, cut 2 round pieces 1, 5 cm larger (for hem) (nr.1) and sew them together(nr. 2), leaving an open space of 17 cm (nr 3).
I recommend pinning the lining before cutting and sewing so you have it in the position you like best. Now sew this lining “pocket” on each slice you crocheted (nr 4); and finish with a last round of SC joining the 2 parts. Remember not to close all the round.
Your bag is ready but you need a shoulder strap simply making starting chains of the lenght you like your strap to be, then make a second row of SC. Sew at the sides of your little bag.
Add a button and that’s all!
If you want a finished bag please visit my alittle market shop
If you like this pattern maybe you will also like my watermelon purse pattern
Copyright 2015 Fabcroc
Se avete dubbi, osservazioni o vi va di condividere le vostre LIME BAGS scrivetemi o contattatemi su Facebook o Twitter.